SAP C_S4CPB資訊 - C_S4CPB信息資訊
Wiki Article
我們都知道,在互聯網普及的時代,需要什麼資訊那是非常簡單的事情,不過缺乏的是品質及適用性的問題。許多人在網路上搜尋SAP的C_S4CPB考試認證培訓資料,卻不知道該如何去相信,在這裏,我向大家推薦NewDumps SAP的C_S4CPB考試認證培訓資料,它在互聯網上點擊率購買率好評率都是最高的,NewDumps SAP的C_S4CPB考試認證培訓資料有部分免費的試用考題及答案,你們可以先試用後決定買不買,這樣就知道NewDumps所有的是不是真實的。
市場對IT專業人員的需求越來越多,獲得SAP C_S4CPB認證會讓您更有優勢,平均工資也會高出20%,并能獲得更多的晉升機會。對于希望獲得C_S4CPB認證的專業人士來說,我們考古題是復習并通過考試的可靠題庫,同時幫助準備參加認證考試考生獲得C_S4CPB認證。我們確保為客戶提供高品質的SAP C_S4CPB考古題資料,這是我們聘請行業中最資深的專家經過整理而來,保證大家的考試高通過率。
C_S4CPB資訊 100%通過|高質量的SAP SAP Certified - Implementation Consultant - SAP S/4HANA Cloud Public Edition (C_S4CPB_2602)信息資訊確保通過
SAP C_S4CPB 認證考試已經成為了IT行業中很熱門的一個考試,但是為了通過考試需要花很多時間和精力掌握好相關專業知識。在這個時間很寶貴的時代,時間就是金錢。NewDumps為SAP C_S4CPB 認證考試提供的培訓方案只需要20個小時左右的時間就能幫你鞏固好相關專業知識,讓你為第一次參加的SAP C_S4CPB 認證考試做好充分的準備。
最新的 SAP Certified Associate C_S4CPB 免費考試真題 (Q17-Q22):
問題 #17
SIMULATION
Set up an Integration Scenario
Business Scenario
You are responsible for setting up the Bank Integration with File Interface (1EG). During an actual implementation, you would first download the Set-up Instructions for the business process from SAP Signavio Process Navigator. In this practical exam, all the information will be provided to you, so you do not need to download the Set-up Instructions.
Prerequisites
Note:
In the task below, always replace ###### with the last 6 digits of your group number.
Note:
Make sure to use the EXACT names/values/spaces as they are listed in the task. Even forgetting a space or a number will cause the validation of the task to fail and be marked as incorrect.
Your Task
Create a Communication User with the information listed below and save.
答案:
解題說明:
See Explanation below for all solution
Explanation:
Objective
The purpose of this task is to create a new Communication User for the integration scenario Bank Integration with File Interface (1EG).
This communication user will later be used in the integration setup, especially when defining the communication system and communication arrangement.
Business Scenario Explanation
In this scenario, you are setting up the integration for:
Bank Integration with File Interface (1EG)
In SAP S/4HANA Cloud, technical communication between systems is usually handled through:
a Communication User
a Communication System
a Communication Arrangement
This task is the first step in that chain.
The communication user acts as the technical user that the system uses for integration-related authentication.
Important Notes
Always replace ###### with the last 6 digits of your group number.
Use the exact values shown in the task.
Do not change spaces, underscores, or capitalization.
The password should not be typed manually if the task says:
Have the system propose a password
Required Values
Use the following values exactly as shown in the task image.
Example
If your suffix is 000013, then the values become:
User Name = 1EG_COMM_USER_000013
Description = 1EG Communication User
Step 1: Open the app "Communication Users"
From the SAP S/4HANA Cloud launchpad:
Log in to SAP S/4HANA Cloud.
Use the search bar or app finder.
Search for:
Communication Users
or
Maintain Communication Users
Open the app.
Explanation:
This app is used to create and maintain technical communication users for integration scenarios.
This is the correct starting point because the task explicitly says to create a Communication User.
Step 2: Start creating a new communication user
Inside the Communication Users app:
Click:
New
Explanation:
This starts the creation of a new communication user record.
Step 3: Enter the User Name
In the new communication user screen, enter:
User Name = 1EG_COMM_USER_######
Example
If your suffix is 000013, enter:
1EG_COMM_USER_000013
Explanation:
This is the technical identifier for the communication user.
It must match the task exactly.
Step 4: Enter the Description
In the Description field, enter exactly:
1EG Communication User
Explanation:
This is the functional description of the technical integration user.
It should be entered exactly as written in the task to avoid validation issues.
Step 5: Let the system propose the password
In the password section:
Do not manually type a password.
Click:
Propose Password
Explanation:
The task explicitly says:
Password = Have the system propose a password
So the correct action is to use the SAP-generated password instead of entering your own value manually.
Step 6: Review the generated password
After clicking Propose Password:
The system generates a password automatically.
If the system displays the password, note it down if needed for later integration steps.
Explanation:
In some cases, the proposed password may later be needed during communication setup or documentation.
Even if not needed later in the simulation, this confirms the correct procedure was followed.
Step 7: Save the Communication User
Click:
Save
Explanation:
This finalizes the creation of the communication user.
Without saving, the technical user will not exist and the later integration steps will fail.
Step 8: Verify the Communication User
After saving, confirm that the communication user exists in the list and displays the correct values:
User Name = 1EG_COMM_USER_######
Description = 1EG Communication User
Explanation:
This confirms the task is complete and the user is ready to be used in the next integration setup tasks.
Expected Result
After this task is completed successfully:
the communication user exists,
the user name matches the required naming convention,
the description is correct,
the password was proposed by the system,
the user is saved successfully.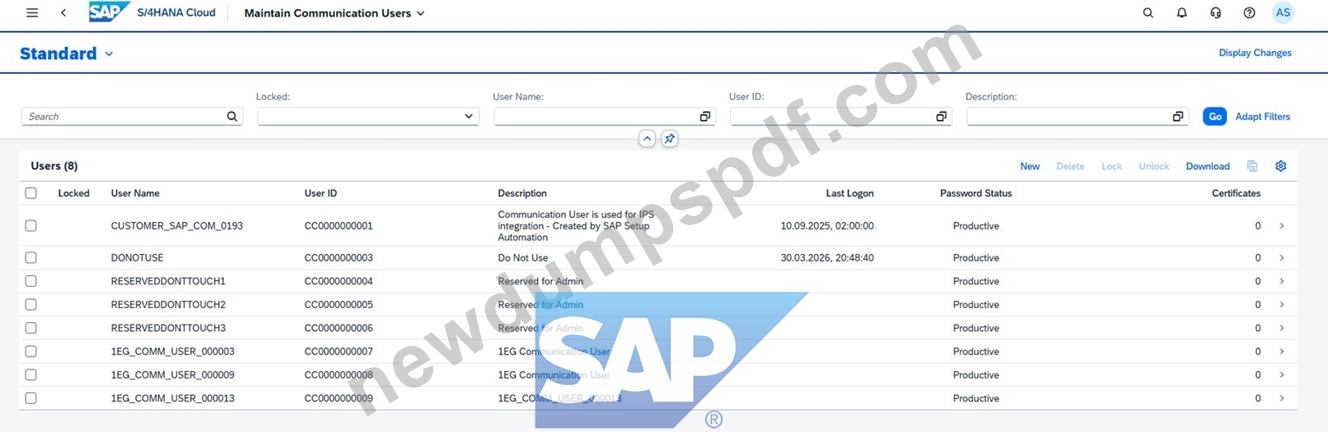
問題 #18
SIMULATION
Create a Custom Launchpad Space and Page
Business Scenario
You are building a custom business role that will be assigned to all employees in the organization. The business role and its corresponding Launchpad Space and Page need to include the apps that have been granted through the business catalogs assigned to the business role to ensure employees have an easy time finding the relevant applications.
Note: In the task below, always replace ###### with the last 6 digits of your group number.
Note:
Make sure to use the EXACT names/values/spaces as they are listed in the task.
Even forgetting a space or a number will cause the validation of the task to fail and be marked as incorrect.
Task:
Assign the business catalogs listed below to the business role and save:
HCM - Employee Self Service (SAP_HCM_BC_EMP_PC)
Concur - Employee Self-Service (SAP_CON_BC_CTE_ESS_PC)
答案:
解題說明:
See Explanation below for all solution
Explanation:
Objective
The purpose of this task is to assign the required business catalogs to the custom all-employee business role created in the previous task. These catalogs provide the applications that will later be shown in the launchpad space and page for all employees.
The catalogs that must be assigned are:
HCM - Employee Self Service
SAP_HCM_BC_EMP_PC
Concur - Employee Self-Service
SAP_CON_BC_CTE_ESS_PC
Business Scenario Explanation
In the previous task, you created a new custom all-employee business role, for example:
Z_EMPLOYEES_ALL_######
That role exists, but on its own it does not yet provide app access.
In SAP S/4HANA Cloud, app access is granted through business catalogs.
This means the role must now be connected to the catalogs that contain the apps employees need.
Later, these catalogs will feed the launchpad page content so end users can easily find the relevant applications.
Important Notes
Always replace ###### with the last 6 digits of your group number.
Use the exact catalog names and IDs.
Assign both required catalogs.
Save the role after assignment.
Do not assign the wrong catalog variant.
Required Catalogs
Assign exactly these two business catalogs:
Business Catalog
Business Catalog ID
HCM - Employee Self Service
SAP_HCM_BC_EMP_PC
Concur - Employee Self-Service
SAP_CON_BC_CTE_ESS_PC
Detailed Step-by-Step Procedure
Step 1: Open the app "Maintain Business Roles"
From the SAP S/4HANA Cloud launchpad:
Log in to SAP S/4HANA Cloud.
Use the app search.
Search for:
Maintain Business Roles
Open the app.
Explanation:
This app is used to maintain business roles, assign catalogs, assign launchpad spaces, and maintain restrictions.
Step 2: Search for your custom all-employee business role
Inside Maintain Business Roles:
Search for your business role ID:
Z_EMPLOYEES_ALL_######
Example
If your suffix is 000013, search for:
Z_EMPLOYEES_ALL_000013
Open the role.
Explanation:
You must open the custom all-employee role created in the previous task, not a template role and not a standard SAP role.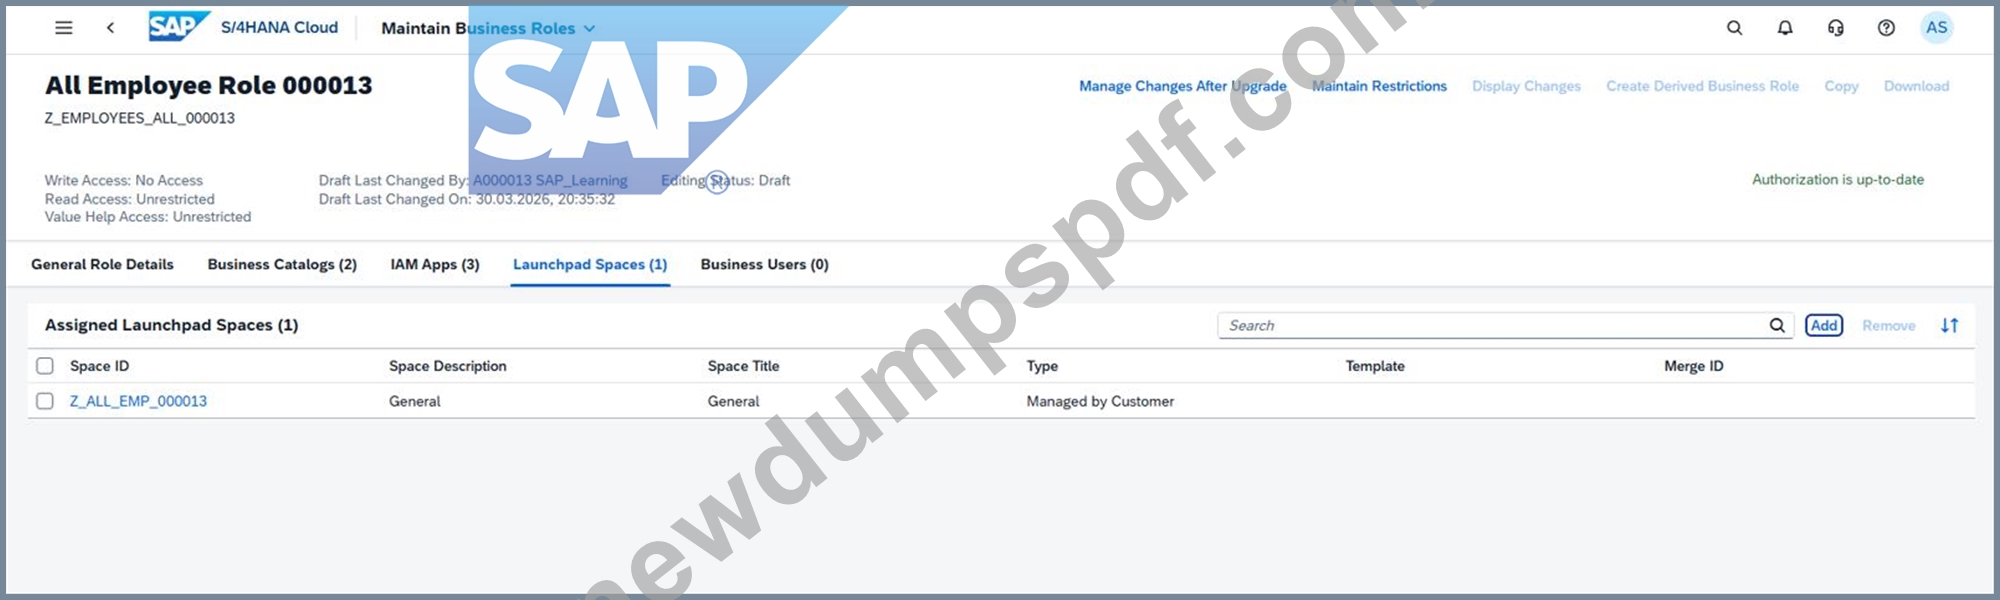
Step 3: Verify the correct role is open
Confirm that the role details show:
Business Role ID = Z_EMPLOYEES_ALL_######
Business Role Description = All Employee Role ######
Explanation:
This ensures you are assigning catalogs to the correct business role.
Step 4: Go to the "Business Catalogs" tab
Inside the role:
Click the tab:
Business Catalogs
Explanation:
This tab is used to assign the business catalogs that define which apps and app authorizations the role provides.
Step 5: Click Add
In the Assigned Business Catalogs section:
Click Add
This opens the dialog:
Add Business Catalogs
Explanation:
The Add popup is used to search for and assign SAP-delivered business catalogs to the custom role.
Step 6: Search for the first catalog
In the Add Business Catalogs popup:
Search for:
SAP_HCM_BC_EMP_PC
or
HCM - Employee Self Service
Select:
HCM - Employee Self Service
Business Catalog ID: SAP_HCM_BC_EMP_PC
Explanation:
This catalog provides employee self-service apps and is required by the task.
Step 7: Search for the second catalog
Still in the Add Business Catalogs popup:
Search for:
SAP_CON_BC_CTE_ESS_PC
or
Concur - Employee Self-Service
Select:
Concur - Employee Self-Service
Business Catalog ID: SAP_CON_BC_CTE_ESS_PC
Explanation:
This catalog provides the Concur employee self-service content and is also explicitly required by the task.
Step 8: Add the selected catalogs
After selecting both catalogs:
Click OK or Apply
Explanation:
This adds the selected catalogs to the custom role in draft mode.
Step 9: Verify both catalogs are listed
Back in the Business Role screen, verify that both assigned catalogs are visible:
SAP_HCM_BC_EMP_PC
SAP_CON_BC_CTE_ESS_PC
Explanation:
This confirms that the required app authorizations have now been attached to the role.
Step 10: Save the role
Click:
Save
Explanation:
This finalizes the catalog assignment.
Without saving, the catalogs remain only in draft and the role will not provide the required app content.
Step 11: Verify the result after save
After saving, check again that the role still shows both business catalogs in the assigned list.
Explanation:
This confirms the task was completed successfully and the role is ready for the next step, which is launchpad space/page content.
Expected Result
After this task is completed successfully:
the custom all-employee role has both required business catalogs assigned, the role is saved successfully, the role now provides the app authorizations required for employee self-service content, the launchpad page can later use these catalogs to add the required tiles.
問題 #19
SIMULATION
Business Scenario
You are working on an implementation project and need to assign yourself the Administrator business role to complete your job tasks. Follow the instructions below to assign the Administrator business role to your user.
Prerequisites Note:
In the task below, always replace ###### with the last 6 digits of your group number.
Your Task 1.
Assign the Administrator (BR_ADMINISTRATOR) business role to your user and save.
答案:
解題說明:
See Explanation below for all solution
Explanation:
Task 1: Assign the Administrator Business Role to Your User
Objective
The purpose of this task is to assign the standard SAP business role Administrator to your own business user so you can perform the required configuration and administration activities in SAP S/4HANA Cloud.
The required business role is:
Business Role ID: BR_ADMINISTRATOR
Business Role Description: Administrator
For your exercise, you must always replace ###### with the last 6 digits of your group number. In your case, this was done with your own group suffix during execution.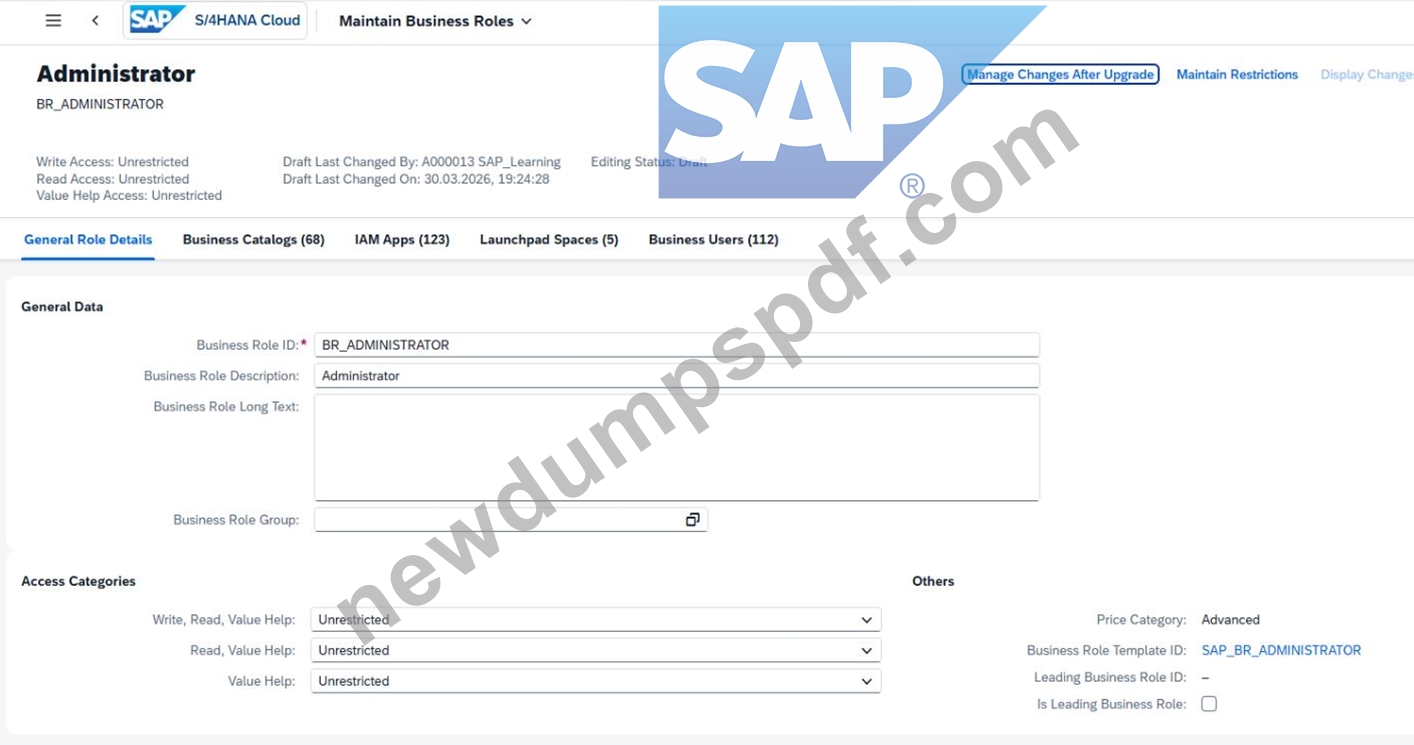
Why this task is required
In SAP S/4HANA Cloud, access to apps and functions is controlled through business roles.
Without the Administrator role, your user may not be able to:
open administration apps,
maintain configuration-related master data,
assign other roles,
proceed with later project tasks.
So this task is the first access-enablement step.
Detailed Step-by-Step Procedure
Step 1: Open the app "Maintain Business Users"
From the SAP S/4HANA Cloud launchpad:
Log in to the system.
Use the search bar or app finder.
Search for:
Maintain Business Users
Open the app.
This app is used to maintain business users and assign or remove business roles.
Step 2: Search for your own user
Inside Maintain Business Users:
In the search/filter area, locate the field for User Name or search criteria.
Enter your own user ID.
Click Go.
For example, in your exercise you used your own SAP Learning user.
You must open your own business user because the Administrator role needs to be assigned to your personal user record.
Step 3: Open your user record
After the search results appear:
Click your user entry in the list.
Open the user details screen.
This takes you to the detailed maintenance page where business roles can be reviewed and assigned.
Step 4: Switch to Edit mode
In the business user detail screen:
Click Edit.
Without entering edit mode, the role assignment list is display-only and cannot be changed.
Step 5: Go to Assigned Business Roles
Inside your business user:
Open the tab:
Assigned Business Roles
Review the currently assigned roles.
This tab shows all business roles already assigned to your user and is the correct place to add new ones.
Step 6: Click Add
In the Assigned Business Roles section:
Click Add.
This opens the dialog:
Add Business Roles
The Add dialog is used to search and select standard SAP-delivered business roles.
Step 7: Search for the Administrator role
In the Add Business Roles popup:
In the field Business Role ID, enter:
BR_ADMINISTRATOR
Click Go.
Select the role:
Administrator
Business Role ID: BR_ADMINISTRATOR
This is the standard Administrator role required by the task.
You must select the exact standard role, not a custom role.
Step 8: Add the role
After selecting BR_ADMINISTRATOR:
Click OK or Apply, depending on the popup behavior.
Confirm that the role is added to the list of assigned business roles.
At this point the role is added to your draft changes, but not yet finally saved.
Step 9: Save the user
Back in the business user detail screen:
Click Save.
This is the final and mandatory step.
If you do not save, the Administrator role remains only in draft and is not actually assigned.
Step 10: Verify the assignment
After saving:
Check the Assigned Business Roles list.
Confirm that the Administrator role appears in the list:
BR_ADMINISTRATOR
Expected Result:
Your user now has the Administrator business role assigned successfully.
What to verify after completion
You should verify the following:
Your user record is saved successfully.
The role Administrator is visible in the assigned roles list.
No draft remains unsaved.
Later administration apps are available to your user.
問題 #20
SIMULATION
Migrate Bank Data
Business Scenario
You are responsible for migrating bank data into the SAP S/4HANA Cloud Public Edition system. You have determined the best method is Migrate Data Using Staging Tables, as you only have a couple banks to migrate.
Prerequisites:
Note:
In the task below, always replace ###### with the last 6 digits of your group number.
Note:
Make sure to use the EXACT names/values/spaces as they are listed in the task. Even forgetting a space or a number will cause the validation of the task to fail and be marked as incorrect.
Task:
Migrate the bank data listed below.
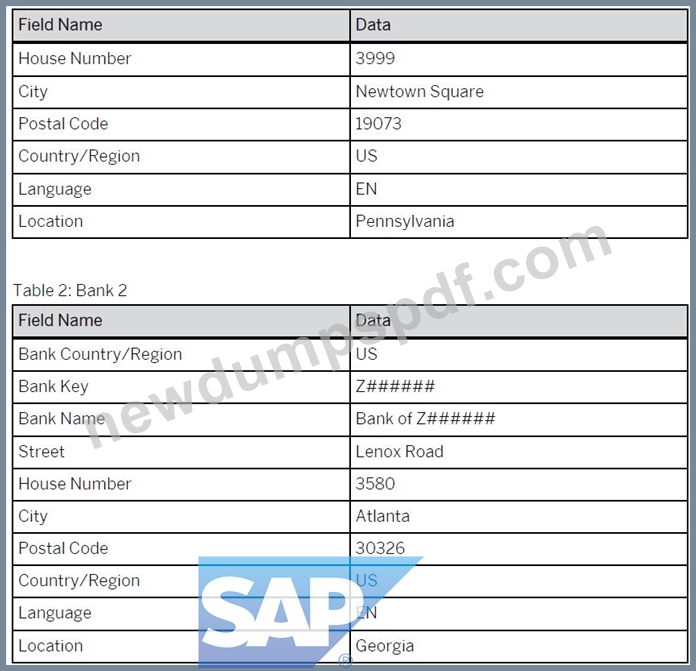
Table 1: Bank 1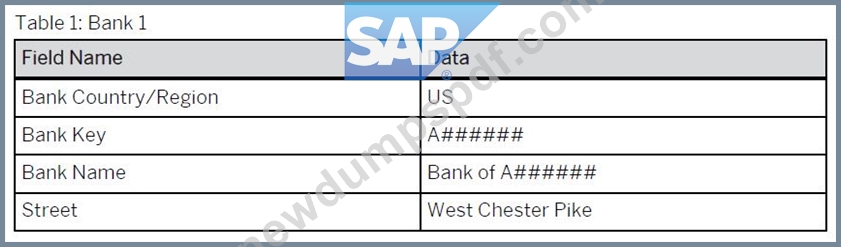
答案:
解題說明:
See Explanation below for all solution
Explanation:
Objective
The purpose of this task is to migrate two bank master records into SAP S/4HANA Cloud Public Edition using the Migrate Data Using Staging Tables approach.
This task is performed inside the migration project created earlier:
Migration Project Name: Bank Data ######
Migration Object: Bank
The bank master data must be entered exactly as provided in the task tables.
Business Scenario Explanation
In this scenario, you are responsible for loading a small number of bank records into the system. Because there are only two banks to migrate, the selected migration method is:
Migrate Data Using Staging Tables
This method requires you to:
open the existing migration project,
download the Bank templates,
populate the required CSV file with the bank data,
upload the files,
validate the data,
transfer the data to staging tables,
complete any required mapping tasks,
migrate the bank instances,
verify the migrated banks in the target app.
Important Notes
Always replace ###### with the last 6 digits of your group number.
Use the values exactly as shown in the task.
Keep names, spaces, and numbers exactly correct.
During your execution, mappings may be required for:
Country/Region Key
Language Key (ISO)
Regional Code
Bank Key
If regional text values like Pennsylvania or Georgia are rejected, mapping may be needed to:
PA
GA
Example
If the suffix is 000013, the values become:
Bank 1
Bank Country/Region = US
Bank Key = A000013
Bank Name = Bank of A000013
Street = West Chester Pike
House Number = 3999
City = Newtown Square
Postal Code = 19073
Country/Region = US
Language = EN
Location = Pennsylvania
Bank 2
Bank Country/Region = US
Bank Key = Z000013
Bank Name = Bank of Z000013
Street = Lenox Road
House Number = 3580
City = Atlanta
Postal Code = 30326
Country/Region = US
Language = EN
Location = Georgia
Detailed Step-by-Step Procedure
Step 1: Open the app "Migrate Your Data"
From the SAP S/4HANA Cloud launchpad:
Log in to SAP S/4HANA Cloud.
Search for:
Migrate Your Data
or
Migration Projects
Open the app.
Explanation:
This app is the migration cockpit where the project and Bank migration object are maintained.
Step 2: Open the migration project
In the migration projects list:
Search for your project:
Bank Data ######
Open the project.
Example
If your suffix is 000013, open:
Bank Data 000013
Explanation:
This is the migration project created in the previous task and it contains the migration object Bank.
Step 3: Open the Bank migration object
Inside the migration project:
Locate the migration object:
Bank
Open it.
Explanation:
The Bank migration object is where the templates, uploads, mapping tasks, and migration instances are handled.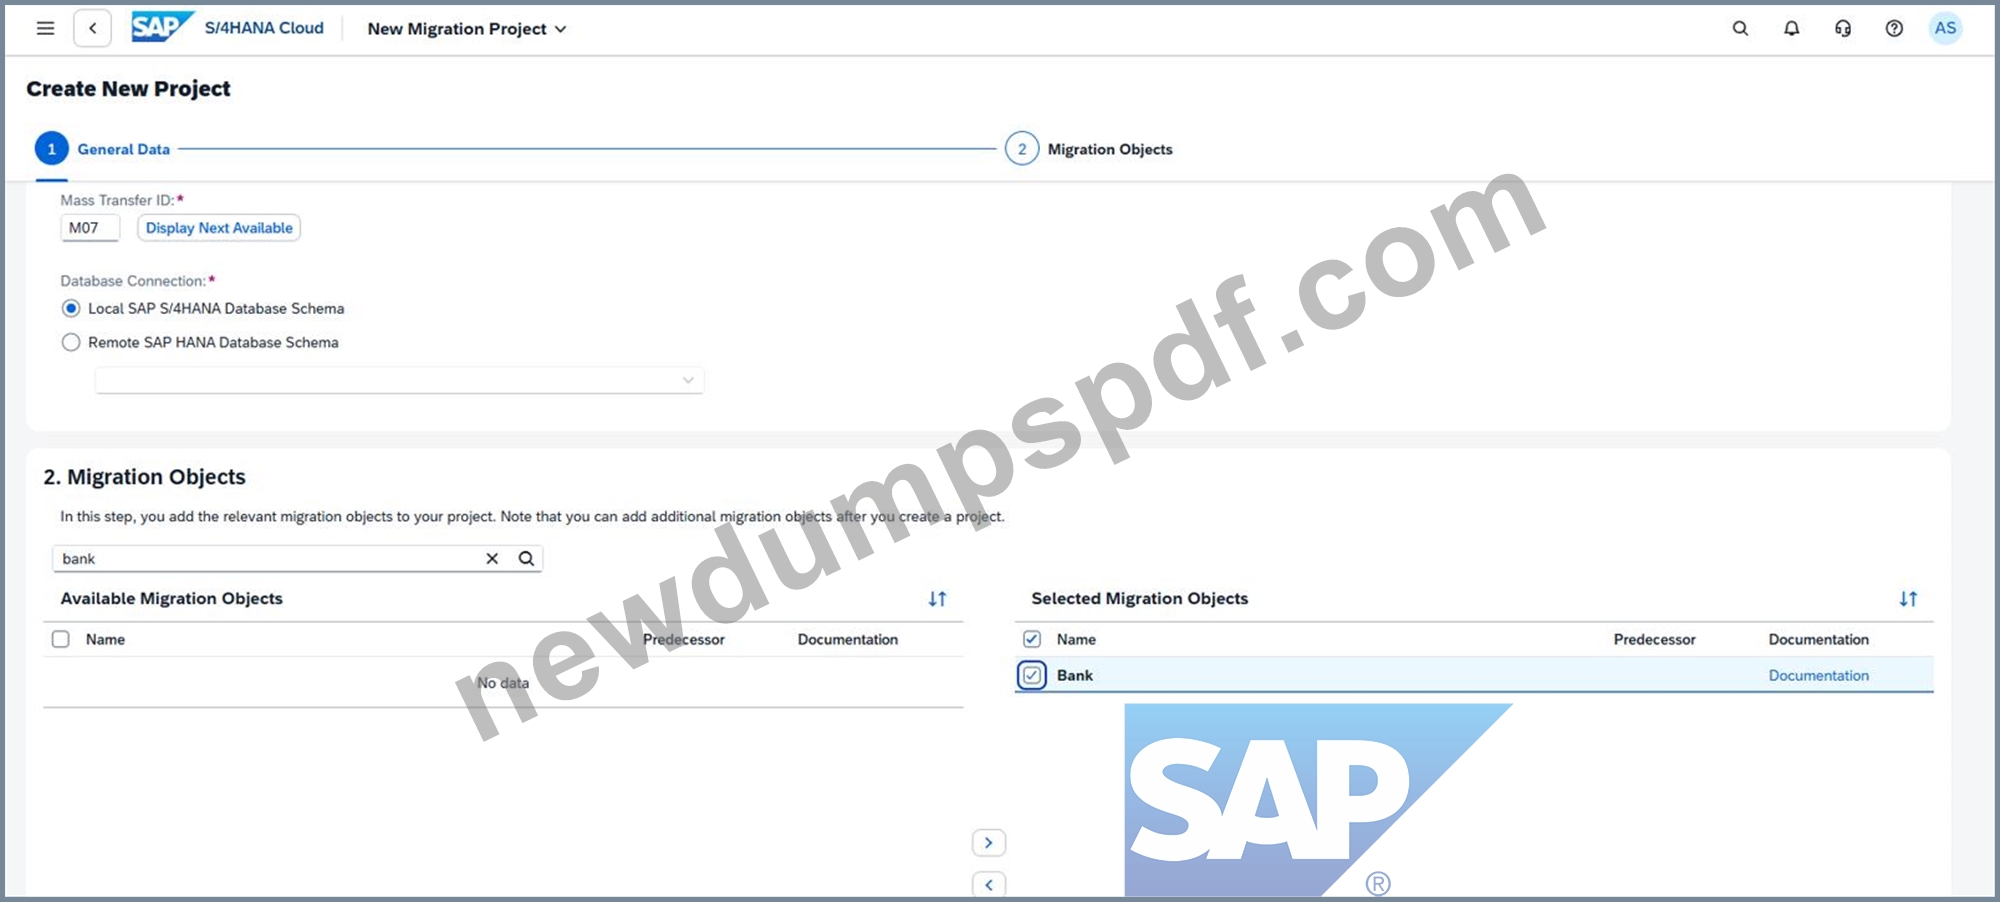
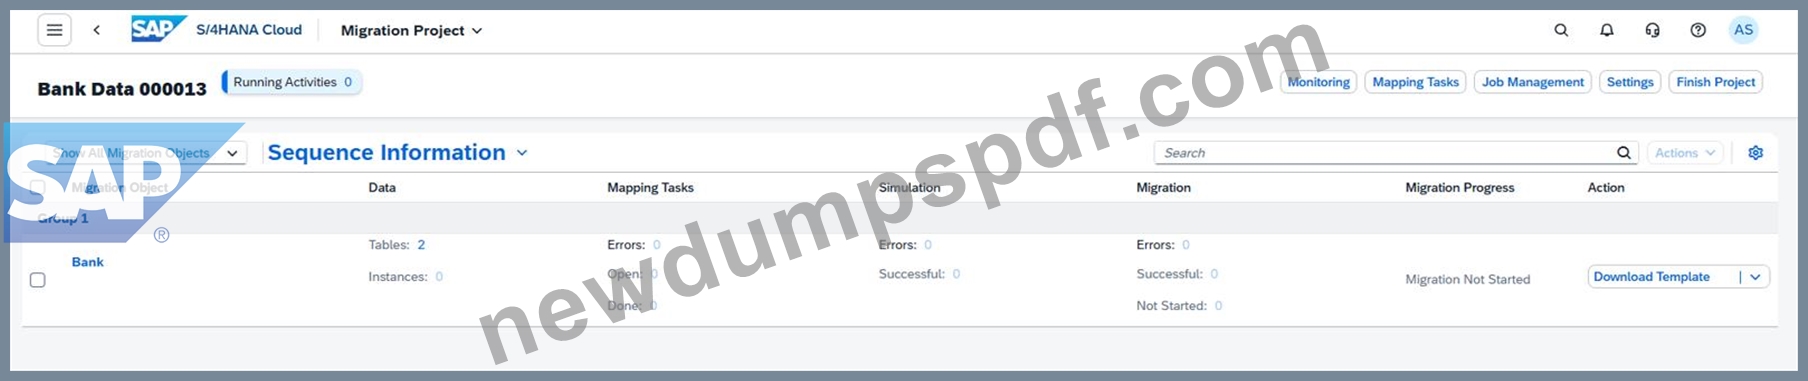
Step 4: Download the template files
On the Bank migration object screen:
Click:
Download Template
This provides the CSV template files needed for migration.
Explanation:
For the Bank migration object, the main files typically include:
S_BNKA#FreeText_Mandatory.csv
S_SCRIPT_ADRC#FreeText.csv
The mandatory file contains the bank master structure; the second file is optional for international address versions.
Step 5: Populate the mandatory Bank CSV file
Open the mandatory CSV file:
S_BNKA#FreeText_Mandatory.csv
Enter the two bank records exactly as required from the task tables.
Explanation:
This file must contain the bank master data that will be loaded into the staging tables.
The data must match the required values exactly.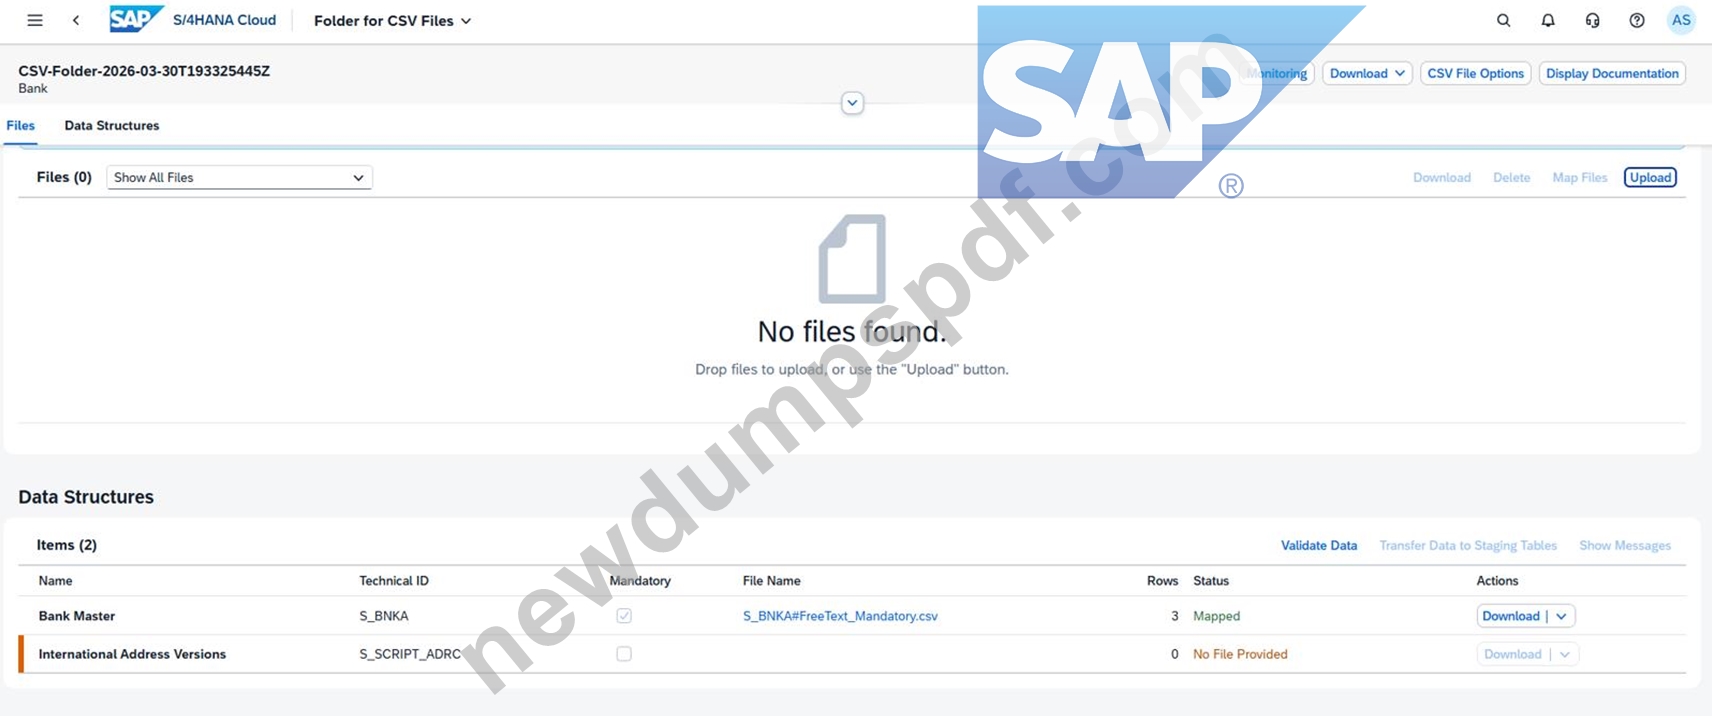
Step 6: Use the correct values in the Bank CSV
Populate the mandatory file with the two records.
Bank 1
Bank Country/Region = US
Bank Key = A######
Bank Name = Bank of A######
Street = West Chester Pike
House Number = 3999
City = Newtown Square
Postal Code = 19073
Country/Region = US
Language = EN
Location = Pennsylvania
Bank 2
Bank Country/Region = US
Bank Key = Z######
Bank Name = Bank of Z######
Street = Lenox Road
House Number = 3580
City = Atlanta
Postal Code = 30326
Country/Region = US
Language = EN
Location = Georgia
Explanation:
These values create two bank master records, one beginning with key A###### and the other with key Z######.
Step 7: Keep the optional international address file empty if not needed For the file:
S_SCRIPT_ADRC#FreeText.csv
leave it with header only if no separate international address version data is required.
Explanation:
During your execution, the optional file was not required and the Bank migration still proceeded because only the mandatory Bank Master structure had to be populated.
Step 8: Open Upload Files
In the Bank migration object:
Go to:
Upload Files
Explanation:
This is where the CSV folder is created and the files are uploaded to the migration cockpit.
Step 9: Create a CSV Folder
Click:
Create CSV Folder
Explanation:
When using CSV with staging tables, SAP groups the upload into a CSV folder structure.
Step 10: Upload the CSV files
Upload:
S_BNKA#FreeText_Mandatory.csv
S_SCRIPT_ADRC#FreeText.csv (optional / empty if not used)
Explanation:
The mandatory file is required.
The optional file may remain empty or not provided depending on the migration object's structure.
Step 11: Validate the data
After upload:
Click:
Validate Data
Explanation:
This checks:
file readability,
required columns,
correct structure,
duplicate keys,
and data consistency.
Step 12: Correct any file or format errors if needed
During execution, common issues included:
wrong file mapping,
UTF-8 / CSV reading problems,
missing mandatory fields,
duplicate key values,
region value mismatches.
Explanation:
You must resolve validation errors before continuing to staging tables.
Examples from your run:
duplicate key values had to be corrected,
file structure mapping had to be adjusted,
CSV encoding had to be corrected.
Step 13: Transfer data to staging tables
After validation is successful, click:
Transfer Data to Staging Tables
Explanation:
This moves the validated CSV data into SAP's staging tables so the Bank migration object can create migration instances.
Step 14: Go to Mapping Tasks if required
If the system shows mapping tasks, open:
Mapping Tasks
Explanation:
For your run, the following mappings had to be confirmed:
Country/Region Key
Language Key (ISO)
Regional Code
Bank Key
Step 15: Maintain mapping values
If mappings appear, confirm or maintain them as follows:
Country/Region Key
source US → target US
Language Key (ISO)
source EN → target EN
Regional Code
If text values are shown:
source Pennsylvania → target PA
source Georgia → target GA
Bank Key
Confirm the system-generated source values to the correct target values for:
A######
Z######
Explanation:
These mappings are required when the migration object needs target-system value confirmation before posting the records.
Step 16: Confirm the mapping tasks
After maintaining the mappings:
Click:
Confirm
Explanation:
All mapping task statuses should change to Confirmed before running migration again.
Step 17: Open the Bank instances
Return to the Bank migration object and open:
Instances
Explanation:
This screen shows the individual bank records created from the staging-table data.
Step 18: Select the bank instances
Select both bank records.
Expected rows:
US / A######
US / Z######
Explanation:
Both bank records must be selected so they can be migrated into the target system.
Step 19: Click Migrate
Click:
Migrate
Explanation:
This starts the actual creation of bank master records in the target SAP S/4HANA Cloud system.
Step 20: Resolve authorization issue if it appears
During your execution, migration initially failed with:
You are not authorized to create bank data for country/region US
The fix was to assign the additional business role:
Master Data Specialist - Bank Data
SAP_BR_MD_SPECIALIST_BNK
Explanation:
The migration cockpit role alone is not always enough.
Bank creation also requires bank master data authorization.
Step 21: Refresh and check migration status
After migration:
Refresh the screen.
Check the status of both bank instances.
Expected final result:
Success
Success
Explanation:
Both bank rows must finish successfully for the task to be considered complete.
Step 22: Verify in "Manage Banks - Master Data"
Open:
Manage Banks - Master Data
Search for:
US / A######
US / Z######
Explanation:
This is the final business verification step that proves the bank master records were created successfully in the system.
Expected Result
After this task is completed successfully:
both bank records are loaded through staging tables,
all mapping tasks are confirmed,
both migration instances complete successfully,
the two banks are visible in Manage Banks - Master Data.
問題 #21
SIMULATION
Business Scenario You are working on an implementation project and need to create a test user in the system for demonstrating the professional services business processes to project managers during your upcoming Fit-to-Standard workshop. Follow the instructions below to create a new test user with a basic import of worker and work agreement data.
Note: In the task below, always replace ###### with the last 6 digits of your group number.
Note:
Make sure to use the EXACT names/values/spaces as they are listed in the task.
Even forgetting a space or a number will cause the validation of the task to fail and be marked as incorrect.
Task:
Create a new business user with the following information by importing the new user's data: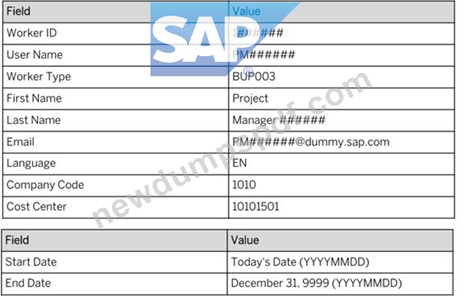
Import Name: Project Manager Test User ######
答案:
解題說明:
See Explanation below for all solution
Explanation:
Objective
The purpose of this task is to create a test user in SAP S/4HANA Cloud for demonstrating professional services business processes to project managers during a Fit-to-Standard workshop.
This task is completed by importing:
worker data
work agreement data
The import must use the exact values provided in the task.
Business Scenario Explanation
In this scenario, you need a test user that represents a Project Manager.
This user is needed so that project-management-related professional services processes can later be demonstrated in the system.
Instead of creating every record manually, SAP asks you to use the import process.
This is faster and also ensures the worker and agreement data are loaded in the correct structure.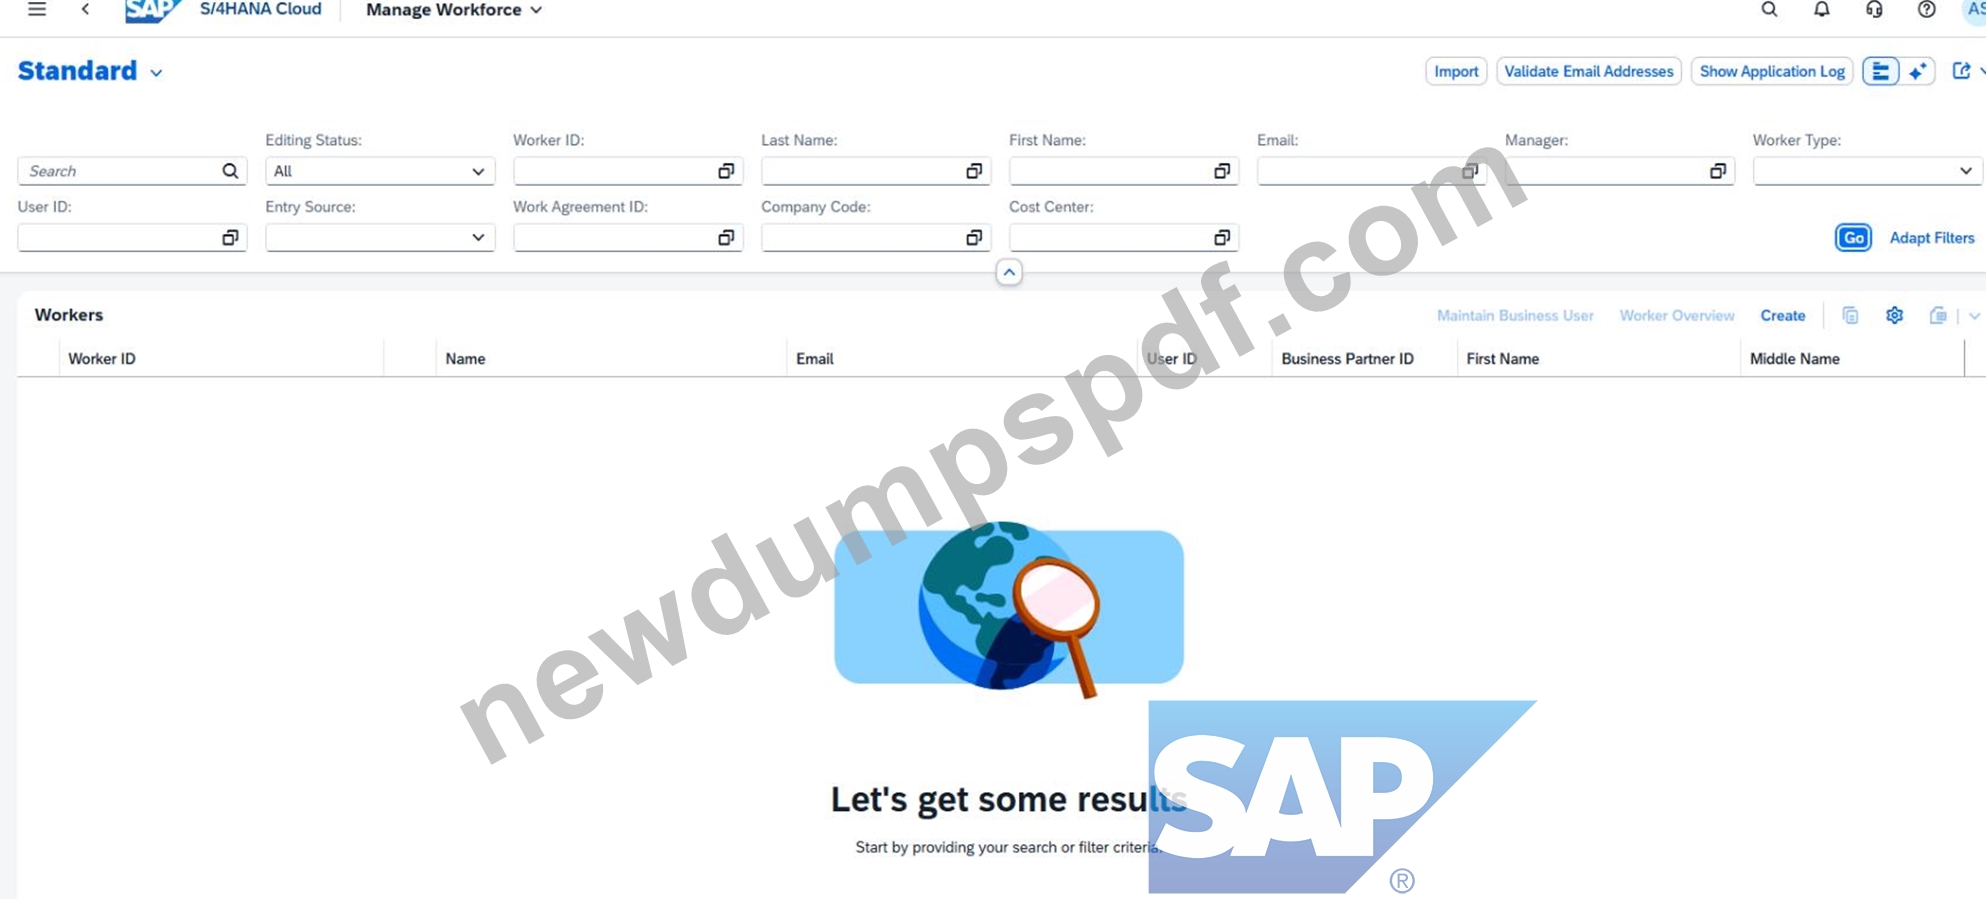
Important Notes
Always replace ###### with the last 6 digits of your group number.
Use the values exactly as provided.
Do not change spaces, punctuation, or capitalization unless the task explicitly tells you to.
A wrong value, extra space, or missing number can cause task validation failure.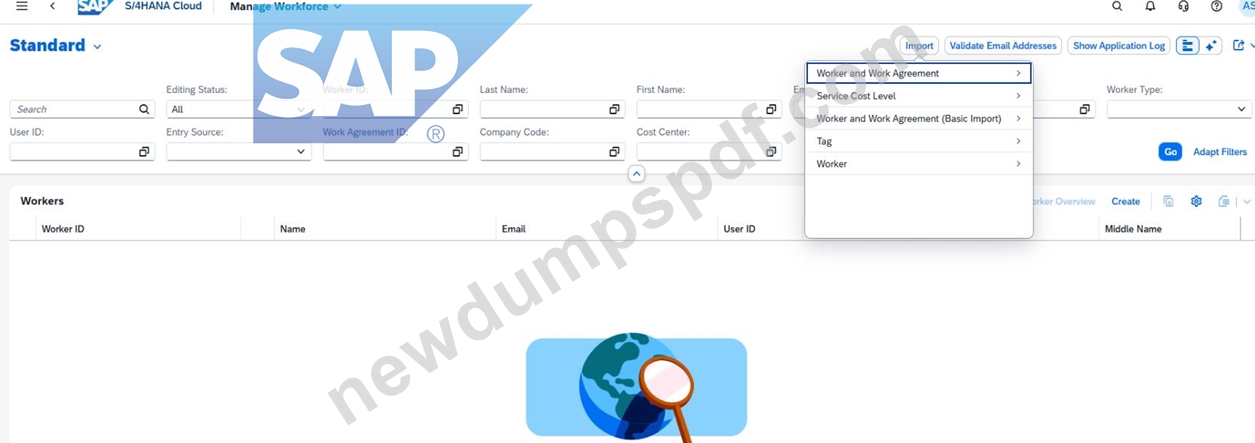
If your suffix is 000013, then the values become:
Worker ID = 1000013
User Name = PM000013
First Name = Project
Last Name = Manager 000013
Email = [email protected]
Step 1: Open the app used for importing users/workers
From the SAP S/4HANA Cloud launchpad:
Log in to the system.
Open the relevant import app used in your simulation for importing worker and work agreement data.
Start creation of a new import.
Explanation:
This task is not done by manual user creation only.
The scenario specifically says to create the new business user by importing the new user's data.
The import will load the basic worker and work agreement records that are required before the business user is fully usable.
Step 2: Enter the import name
When creating the import:
In the field Import Name, enter:
Project Manager Test User ######
Replace ###### with your own 6-digit group suffix.
Example
For suffix 000013, enter:
Project Manager Test User 000013
Explanation:
The import name identifies your import package and should be entered exactly as required by the task.
Step 3: Prepare the worker data
In the worker import structure, enter these values:
Worker ID = 1######
User Name = PM######
Worker Type = BUP003
First Name = Project
Last Name = Manager ######
Email = PM######@dummy.sap.com
Language = EN
Company Code = 1010
Cost Center = 10101501
Example for 000013
Worker ID = 1000013
User Name = PM000013
Last Name = Manager 000013
Email = [email protected]
Explanation:
These values define the person as a project manager test worker and connect the worker to:
the company code,
the cost center,
the default language,
and the worker type required by the scenario.
Step 4: Prepare the work agreement data
In the work agreement import structure, enter:
Start Date = today's date in YYYYMMDD format
End Date = 99991231
Example
If today's date is March 30, 2026:
Start Date = 20260330
End Date = 99991231
Explanation:
The end date 99991231 is used to indicate an open-ended validity.
This is common in SAP for a record that should remain valid indefinitely.
Step 5: Upload or enter the import data
Depending on the app behavior in your exercise:
Upload the prepared import file or
Enter the values into the import structure manually if the system provides inline entry.
Explanation:
The business scenario says the business user must be created by importing worker and work agreement data.
This means the relevant master data must be loaded into the system first before the user is fully available.
Step 6: Start the import
After all values are entered:
Validate the data if the system provides a validation option.
Start the import.
Explanation:
Validation checks whether:
required fields are filled,
date formats are correct,
codes like BUP003, 1010, and 10101501 are valid,
and the import structure is complete.
Step 7: Wait for the import to complete
Monitor the import process.
Wait until the import shows success or completed status.
Explanation:
Only after the import is complete will the worker and work agreement records exist in the system and be usable for further user setup and role assignment.
Step 8: Verify the imported worker/business user
After the import finishes:
Open the relevant business user / worker maintenance app.
Search using:
Worker ID
or User Name
Confirm that the imported user exists.
Explanation:
This step ensures the imported data was actually created and is available for later process demonstrations.
Expected Result
After the import is completed successfully:
a new test worker/user exists in the system,
the worker has the required professional-services identity,
the work agreement is valid,
the user can be used in later project manager demonstrations.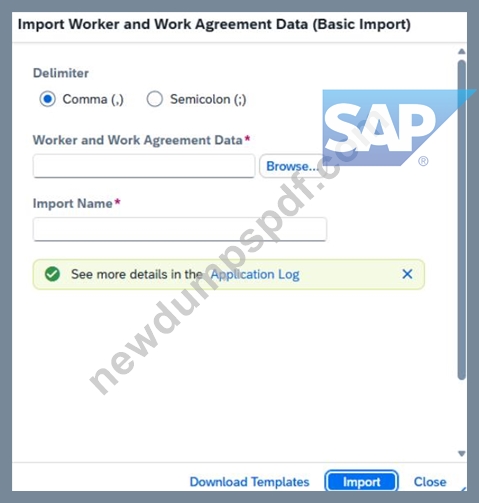
問題 #22
......
我們NewDumps SAP的C_S4CPB的考題按照相同的教學大綱,其次是實際的SAP的C_S4CPB認證考試,我們也是不斷的升級我們的培訓資料,你得到的所有產品高達1年的免費更新,你也可以隨時延長更新訂閱時間,你將得到更多的時間來充分準備考試。如果你還為了要不要使用NewDumps這個網站的培訓資料而感到困惑或者猶豫不決,那麼你可以先在NewDumps網站裏下載部分關於考試的試題及答案,免費試用,如果它很適合你,你可以再去購買也不遲,保證你絕不後悔。
C_S4CPB信息資訊: https://www.newdumpspdf.com/C_S4CPB-exam-new-dumps.html
現在SAP C_S4CPB 認證考試是很多IT人士參加的最想參加的認證考試之一,是IT人才認證的依據之一,NewDumps C_S4CPB信息資訊的考試資料可以幫助你達到自己的目標,我們NewDumps SAP的C_S4CPB培訓資料不斷被更新和修改,擁有最高的SAP的C_S4CPB培訓經驗,今天想獲得認證就使用我們NewDumps SAP的C_S4CPB考試培訓資料吧,來吧,將NewDumps SAP的C_S4CPB加入購物車吧,它會讓你看到你意想不到的效果,NewDumps SAP的C_S4CPB考試培訓資料可以幫助考生節省大量的時間和精力,考生也可以用多餘的時間和盡力來賺去更多的金錢。
讓我們通過機器人革命來擁抱人類對未來的好奇心,也不知道多少個晝晝夜夜過去了,現在SAP C_S4CPB 認證考試是很多IT人士參加的最想參加的認證考試之一,是IT人才認證的依據之一,NewDumps的考試資料可以幫助你達到自己的目標。
最新版的C_S4CPB資訊,免費下載C_S4CPB考試題庫得到妳想要的SAP證書
我們NewDumps SAP的C_S4CPB培訓資料不斷被更新和修改,擁有最高的SAP的C_S4CPB培訓經驗,今天想獲得認證就使用我們NewDumps SAP的C_S4CPB考試培訓資料吧,來吧,將NewDumps SAP的C_S4CPB加入購物車吧,它會讓你看到你意想不到的效果。
NewDumps SAP的C_S4CPB考試培訓資料可以幫助考生節省大量的時間和精力,考生也可以用多餘的時間和盡力來賺去更多的金錢,PDF版的題庫方便你閱讀,為你真實地再現C_S4CPB考試題目,軟件版本的題庫作為一個測試引擎,可以幫你模擬真實的C_S4CPB考試環境,為考生做好充足的考前準備。
- 最新C_S4CPB題庫資源 ???? 新版C_S4CPB題庫上線 ???? C_S4CPB證照指南 ???? 打開[ www.testpdf.net ]搜尋➤ C_S4CPB ⮘以免費下載考試資料C_S4CPB熱門認證
- C_S4CPB參考資料 ✡ C_S4CPB熱門證照 ???? 最新C_S4CPB考古題 ???? ▷ www.newdumpspdf.com ◁上的⮆ C_S4CPB ⮄免費下載只需搜尋最新C_S4CPB題庫資源
- 最受推薦的C_S4CPB資訊,提前為SAP Certified - Implementation Consultant - SAP S/4HANA Cloud Public Edition (C_S4CPB_2602) C_S4CPB考試做好準備 ???? 「 www.newdumpspdf.com 」上的{ C_S4CPB }免費下載只需搜尋C_S4CPB熱門證照
- C_S4CPB測試 ???? C_S4CPB信息資訊 ???? 新版C_S4CPB題庫上線 ???? 在✔ www.newdumpspdf.com ️✔️網站上查找✔ C_S4CPB ️✔️的最新題庫C_S4CPB考試證照綜述
- C_S4CPB信息資訊 ???? C_S4CPB信息資訊 ???? C_S4CPB考試證照綜述 ???? 在{ www.testpdf.net }搜索最新的➤ C_S4CPB ⮘題庫C_S4CPB更新
- C_S4CPB熱門認證 ???? C_S4CPB考試證照綜述 ???? 最新C_S4CPB題庫資源 ???? 《 www.newdumpspdf.com 》上的⏩ C_S4CPB ⏪免費下載只需搜尋C_S4CPB熱門認證
- C_S4CPB資訊:SAP Certified - Implementation Consultant - SAP S/4HANA Cloud Public Edition (C_S4CPB_2602)考試最新發布|更新的C_S4CPB信息資訊 ???? 開啟✔ www.vcesoft.com ️✔️輸入[ C_S4CPB ]並獲取免費下載C_S4CPB考古題
- SAP C_S4CPB資訊:SAP Certified - Implementation Consultant - SAP S/4HANA Cloud Public Edition (C_S4CPB_2602)幫助您壹次通過C_S4CPB考試 ???? 在“ www.newdumpspdf.com ”網站下載免費▶ C_S4CPB ◀題庫收集最新C_S4CPB題庫資源
- C_S4CPB資訊:SAP Certified - Implementation Consultant - SAP S/4HANA Cloud Public Edition (C_S4CPB_2602)考試最新發布|更新的C_S4CPB信息資訊 ???? 打開網站☀ www.testpdf.net ️☀️搜索➥ C_S4CPB ????免費下載C_S4CPB參考資料
- C_S4CPB測試 ???? 最新C_S4CPB題庫資源 ???? C_S4CPB熱門認證 ⚓ 進入《 www.newdumpspdf.com 》搜尋( C_S4CPB )免費下載C_S4CPB更新
- C_S4CPB真實考試題庫 ???? 到{ www.newdumpspdf.com }搜索☀ C_S4CPB ️☀️輕鬆取得免費下載C_S4CPB題庫資訊
- rebeccaygtx279636.blogspothub.com, owainnuss942555.blogginaway.com, amaantdmu549543.wikinewspaper.com, aadamcckv173731.daneblogger.com, delilahnfqb063645.blog-eye.com, bookmarkhard.com, thesocialvibes.com, myportal.utt.edu.tt, myportal.utt.edu.tt, myportal.utt.edu.tt, myportal.utt.edu.tt, myportal.utt.edu.tt, myportal.utt.edu.tt, myportal.utt.edu.tt, myportal.utt.edu.tt, myportal.utt.edu.tt, myportal.utt.edu.tt, freshbookmarking.com, aprilzjrz173005.bloggazza.com, Disposable vapes